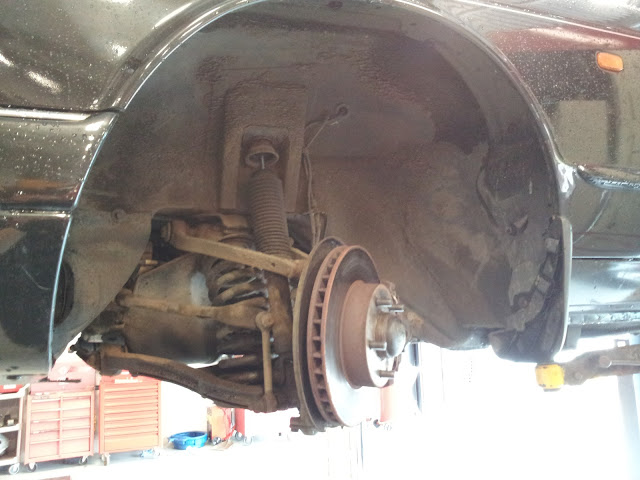
While 'The Beastie' is resting, pending new bits, I have focused some attention on the Almera. An opportunity arose on Thursday afternoon to bring it into the college workshop so that I could try and track down an annoying 'clonk' from somewhere in the front. It's quite apparent on uneven surfaces, or when turning right. Given that a lot of Edinburgh still has cobbled streets the noise is beginning to annoy me.
There wasn't a free ramp to begin with during the class so I initially popped the car up onto axle stands at the front so that I could have a good poke about underneath. First impressions were good in that there wasn't anything loose or bushes that were obviously split. One thing I did notice though was that the trailing edge of the front bumper on the nearside was flapping about because of broken mounts. Thinking that might be the cause of the noise I set about repairing it. I used pop rivets through the plastic to secure the bumper ends to the arch liner. It isn't elegant, or permanent, but it will do for now.
Nothing appeared to be amiss under the Nissan so I dropped it back onto the level ground & began checking the fluids while a classmate did the tyre pressures. I'm glad I did the check because I found out there was nearly no oil in it!
Apparently, the garage who sold me the car had checked all the fluids before sale. If that was the case and they were all fine, then the Nissan is either burning oil or losing it some other way. I certainly haven't noted it marking its territory as the Jag normally does so that could indicate the oil is being used by the Almera's gutless 1.5. I fired in a litre of 10w40 to bring the dipstick level up to a more acceptable place then put the car onto a free 2-post for further checks.
Once again, there was no odd suspension travel apparent, no wear or play, but I did see a potential oil leak from around the top of the pump. One to keep an eye on then. I also discovered that the rear gearbox mount is a bit worn which could account for the judder felt while using reverse.
Other than those wee things the Almera is looking good. The 'clonk' seemed to be a wee bit better on the drive home but it was still there. I suspect there's maybe another loose bit of trim or something I'm missing. It might even just be the motion of the heavy bonnet bumping against its stops. My partners old Ka was noisy like that. In any case I'm pleased that the levels & tyre pressures were checked. If they hadn't been it might have led to expensive damage. Just goes to show how important the seemingly mundane checks are. When was the last time you checked your car? :)
Saturday, 29 September 2012
Monday, 24 September 2012
Diamonds are forever...
When new, my Jag was fitted with Diamond Turned 20-spoke alloy wheels. They were the same as the normal Sovereign wheels but, instead of a painted finish, the spokes received a gentle grind from a diamond equipped tool which brought out the naturally shiny glow of the aluminium alloy used to make them. A lacquer was then applied to stop any corrosion. Sadly, over time, the lacquer can crack and allow moisture in, which is exactly what has happened to my alloys. They look awful.
I had made some enquiries about refinishing the wheels but people were saying it isn't possible to get them back to the original state. I'd have to settle for a painted finish. It's either that, or choose a totally different type of wheel altogether. However, I might have found a place that can help. It would cost a bit of money, and I'd need replacement wheels to use while mine are sent off, but it does seem possible that the Jag's boots will gleam again. Here's what they should look like... I'll keep you updated on progress.

I had made some enquiries about refinishing the wheels but people were saying it isn't possible to get them back to the original state. I'd have to settle for a painted finish. It's either that, or choose a totally different type of wheel altogether. However, I might have found a place that can help. It would cost a bit of money, and I'd need replacement wheels to use while mine are sent off, but it does seem possible that the Jag's boots will gleam again. Here's what they should look like... I'll keep you updated on progress.
Do want, x4 please...
Friday, 21 September 2012
Anchors - Day 2...
Picking up from where we left off yesterday, my classmates & I began putting the Jag back together. Sadly, I didn't get any pictures of any of it because the pressure was on to get the job done and get the car out of the door. As Hagrid would say, "Sorry 'bout that!".
First things first, we refitted the rear wheels. All punctures & leaks had been sorted so they were good to go back on. Although I noted yesterday the rear pads and discs are worn out, they still work, and are going to have to keep on working until mid next week when I can get hold of replacements. New parts are out of the budget range so hopefully the bent 4.0 Sport that donated its front components will also donate its rears. And bumpstops too. Maybe.
Once the rears were refitted we moved onto the front of the Jag and focused out attention back on the brakes to remove the old callipers. I had been down in the workshop earlier in the day so that I could spray even more WD40 on everything which meant that dismantling the old gear was a lot easier. Their flexi's needed to come away and we aimed to cannibalise any good parts from them, like unchewed bleed nipples and rubber covers.
Incidentally, here's a top tip I learned while disconnecting the flexi's - have a set of blank ends you can screw onto any brake pipes you cannot clamp, so that fluid loss is minimised. To make them, simply create one end of a replacement brakepipe as you normally would, but instead of putting a union at the other end, hammer it flat and fold it over. Cheers to Billy for that one! As we didn't have any of those to hand, the new flexi's were temporarily fitted then clamped while we tested the new callipers before they were bolted on.
While one team got on with that, I set about putting new ends on the ABS earth wire for the OSF which had come adrift at the calliper. I had hoped to re-crimp the original ends of the wire however there wasn't enough time, so non-original generic ones were used. The attachment bolt was pretty rounded but I was able to shift it using an Imperial socket ever so slightly smaller than the 8mm Metric socket that should have fitted. To make sure it was securely on I gave it a wee tap with a hammer - which can also serve to 'shock' the threads a bit, releasing the hold any corrosion might have on the part. This is also a good way to free up stubborn brake nipples too. A golden rule there though is simply never force it and don't get angry - that's when you break stuff or inadvertently punch something hard, like a subframe, when the threads finally release. Just soak it in penetrating fluid & try again in a bit.
Moving back to the replacement callipers, they were confirmed as good. We later found out the brake circuit rig was filled with green LHM instead of Dot 4 fluid which would mean a really, REALLY thorough bleeding after fitting the callipers as the LHM is not good for their seals so needed to be flushed out. All the parts went back together, torqued up to the settings from Autodata, then we bled the front brakes, making sure that the fluid coming through was clear and free of bubbles. The brake fluid reservoir was filled up to 'MAX' then it was simply a case of refitting the front roadwheels and torqueing them up too. The Jag came down off the ramps and it was time for a road test.
Now I must admit, 1st impressions were not good. The pedal went almost all the way to the floor and the brakes felt horrible. Before the job I would say they had a typical Ford feeling, in that there was a positive action, a firm pedal, and a 'bite' point probably halfway up. As I backed out of the workshop though they were just 'mushy'. However, as I drove the car the action of the brakes improved. The pedal movement was still odd but the pulsing, juddering, pulling to the left, drone when coming to a halt from high speeds, and the high speed wheel-wobble, had gone. A quick visual check confirmed no brake fluid leaks so there must be some air still in the circuit somewhere. I would like to re-bleed the entire system, rather than just the front callipers, and triple check that all unions and hoses are tight. That's a job for Monday lunchtime at Mulsanne.
So, mission accomplished for the brakes. If the re-bleed doesn't cure the softness I may have to live with it. The brakes do work and the spongy feeling may just be down to the new flexi hoses having a bit more 'give' under pressure than the original (and expensive) Jag bits after all. And anyway, the new brakes still need to 'bed in' a bit.
The next job - before anything else - has to be the upper timing chain tensioner. To do that I will need a few hours to remove the cam cover and replace some of the guides (if accessible) as well as the tensioner itself. I'd rather fit a Type 2 one but in the absence of that a Type 1 will do. The latter are easy to swap out at a later date. This forum post covers the whole procedure and the details exactly the symptoms I've been experiencing. http://www.jaguarforums.com/forum/xj-x300-xjr-26/note-redesigned-upper-tensioner-x300-can-also-fail-61698/
That's for another day though. Tonight I'm celebrating another job done in the restoration of this fantastic car and I'd like to thank, again, everyone who has done anything to help out with the project! :-)
Thursday, 20 September 2012
Anchors - Day 1...
I started replacing the front brakes today with the help of my classmates in the Level 2 City & Guilds Light Vehicle Maintenance & Repair group, but it didn't all go according to plan...
The Jag was feeling a bit sulky having been left alone on the roadside for a week or two and on startup there was a really good misfire. I'll put that down to lack of use and the really grim, very wet weather that seems to have stalled over Edinburgh & The Lothians today. I let her warm up for a bit and the misfire went away, then I set out on the trip to college which was uneventful but satisfying nonetheless. It felt good to be back in the Jag.
The 'Core Skills' classes (Communication, Numeracy & ICT) flew by during the morning, then after lunch it was time to get started. A 2-post ramp was picked and after a bit of adjustment we set up the arms for the ramp, lifting the Jag gently off the ground. My classmates got stuck in by loosening off the 22mm bolts holding the roadwheels, then taking them off completely with the vehicle raised to a safe working height. Both nearside wheels went off to the tyre machine to have their punctures fixed, while the offside ones were placed out of the way. With the wheels off, access to the discs, pads & callipers is brilliant...
I went round all the nuts & bolts we'd be removing with WD40 to make our job easier, then went on to do some other tasks while it soaked in.
One of the things I keep banging on about is the lack of rust on the car, and I want to keep it that way. Taking advantage of the fact the Jag was at a good working height all the wee grot traps in the arches were scraped out and gently wirebrushed to get rid of the accumulated mud and crap that will dissolve the car if left unchecked. I was really pleased to find that someone in the Jag's past had filled in the vulnerable leading edge of the rear arch, where it meets the sill, with some sort of hard material that prevents mud getting stuck there. The return lip of all the arches was cleaned out and we found that the original looking underseal appears to be in good nick. My recently applied Tetraseal doesn't seem to have covered as much as I would have liked so that is going to be re-done.

While my classmates continued the cleaning of the arches, I caught up with the lads who were dealing with the tyres. The NSF was losing air around the rim while the NSR had a sodding great bolt in it. The NSF was already off its wheel, which was being sanded down and smoothed, then coated with rim sealer to make it airtight. Once that tyre was refitted we balanced the unit but found it way, way out. The solution was to pop the tyre off the rim again and rotate it 180°. The reason for this was to put the 'heavy' part of the tyre opposite the 'heavy' part of the wheel. With that done the amount of weight needed to balance everything came down to more sensible levels. The NSR tyre got a puncture repair and balancing that one was less traumatic, it was pretty much dead on first time. I can honestly say though that my alloys have had it. The polished aluminium finish is peeling off like old paint in a wet ruin. Replace, or refurbish? I've been told that a basic refurbishment is completely possible, but I want the polished finish - just because I like it shiny. How to get that, cheaply, will be the challenge. In the meantime I may swap out the alloys for something different.
Back at the 2-poster, the original pads, callipers & discs were coming off. The seized NSF put up a fight and needed a pry bar plus some oaths to come away, while the carrier bolts on the OSF were being awkward too. More WD40 required. The pads on both sides seem to have plenty of meat on them surprisingly so I'll keep them as spares. As we stripped off the rest of the old bits though, we found a potentially very serious problem or two, which is when my plan to have all this done in one afternoon came off the rails...
The team discovered that both brake flexi pipes at the front are f... ff... fffu... broken. They have perished and split. No fluid is leaking yet, but all it would take is one hearty stamp on the anchors to burst them. Which would mean no brakes. Given that the whole point of doing the brakes is to make sure the Jag is safe, there was no way I was going to fit replacement callipers, discs & pads but leave dangerous flexi's attached. For the sake of £17 for a set I'm not going to muck about. Eskside Factors wouldn't be able to deliver until Friday afternoon though which meant the Jag would not be off the ramp today.
With that spanner in the works I took some time out to check the rear discs & pads, They are past it. The pads are pretty much down to bare metal and the discs are close to their minimum tolerance, with a pronounced lip around the edge. I have a feeling that Eskside may be delivering more than just flexi pipes tomorrow. Better safe than sorry though. I also noticed that one bumpstop is gone and the other is hanging off. Easy fix though.
So, that was Anchors - Day 1. Stay tuned for another update tomorrow when we test the callipers, put it all back together, adjust the handbrake and bleed the system before roadtesting.

The Jag was feeling a bit sulky having been left alone on the roadside for a week or two and on startup there was a really good misfire. I'll put that down to lack of use and the really grim, very wet weather that seems to have stalled over Edinburgh & The Lothians today. I let her warm up for a bit and the misfire went away, then I set out on the trip to college which was uneventful but satisfying nonetheless. It felt good to be back in the Jag.
The 'Core Skills' classes (Communication, Numeracy & ICT) flew by during the morning, then after lunch it was time to get started. A 2-post ramp was picked and after a bit of adjustment we set up the arms for the ramp, lifting the Jag gently off the ground. My classmates got stuck in by loosening off the 22mm bolts holding the roadwheels, then taking them off completely with the vehicle raised to a safe working height. Both nearside wheels went off to the tyre machine to have their punctures fixed, while the offside ones were placed out of the way. With the wheels off, access to the discs, pads & callipers is brilliant...

Front discs - gubbed...
I went round all the nuts & bolts we'd be removing with WD40 to make our job easier, then went on to do some other tasks while it soaked in.
One of the things I keep banging on about is the lack of rust on the car, and I want to keep it that way. Taking advantage of the fact the Jag was at a good working height all the wee grot traps in the arches were scraped out and gently wirebrushed to get rid of the accumulated mud and crap that will dissolve the car if left unchecked. I was really pleased to find that someone in the Jag's past had filled in the vulnerable leading edge of the rear arch, where it meets the sill, with some sort of hard material that prevents mud getting stuck there. The return lip of all the arches was cleaned out and we found that the original looking underseal appears to be in good nick. My recently applied Tetraseal doesn't seem to have covered as much as I would have liked so that is going to be re-done.

Rear arches - all good. Discs - gubbed... Spot the missing bumpstop.
While my classmates continued the cleaning of the arches, I caught up with the lads who were dealing with the tyres. The NSF was losing air around the rim while the NSR had a sodding great bolt in it. The NSF was already off its wheel, which was being sanded down and smoothed, then coated with rim sealer to make it airtight. Once that tyre was refitted we balanced the unit but found it way, way out. The solution was to pop the tyre off the rim again and rotate it 180°. The reason for this was to put the 'heavy' part of the tyre opposite the 'heavy' part of the wheel. With that done the amount of weight needed to balance everything came down to more sensible levels. The NSR tyre got a puncture repair and balancing that one was less traumatic, it was pretty much dead on first time. I can honestly say though that my alloys have had it. The polished aluminium finish is peeling off like old paint in a wet ruin. Replace, or refurbish? I've been told that a basic refurbishment is completely possible, but I want the polished finish - just because I like it shiny. How to get that, cheaply, will be the challenge. In the meantime I may swap out the alloys for something different.
Back at the 2-poster, the original pads, callipers & discs were coming off. The seized NSF put up a fight and needed a pry bar plus some oaths to come away, while the carrier bolts on the OSF were being awkward too. More WD40 required. The pads on both sides seem to have plenty of meat on them surprisingly so I'll keep them as spares. As we stripped off the rest of the old bits though, we found a potentially very serious problem or two, which is when my plan to have all this done in one afternoon came off the rails...
The team discovered that both brake flexi pipes at the front are f... ff... fffu... broken. They have perished and split. No fluid is leaking yet, but all it would take is one hearty stamp on the anchors to burst them. Which would mean no brakes. Given that the whole point of doing the brakes is to make sure the Jag is safe, there was no way I was going to fit replacement callipers, discs & pads but leave dangerous flexi's attached. For the sake of £17 for a set I'm not going to muck about. Eskside Factors wouldn't be able to deliver until Friday afternoon though which meant the Jag would not be off the ramp today.
With that spanner in the works I took some time out to check the rear discs & pads, They are past it. The pads are pretty much down to bare metal and the discs are close to their minimum tolerance, with a pronounced lip around the edge. I have a feeling that Eskside may be delivering more than just flexi pipes tomorrow. Better safe than sorry though. I also noticed that one bumpstop is gone and the other is hanging off. Easy fix though.
So, that was Anchors - Day 1. Stay tuned for another update tomorrow when we test the callipers, put it all back together, adjust the handbrake and bleed the system before roadtesting.

See the crud on the floor? That's what was left AFTER we cleaned up the rubbish scraped out the arches.
Tuesday, 18 September 2012
A change is as good as a rest...
It has been an eventful few weeks in Jag terms. For starters I was finally able to get the oil & filter change out of the way, plus I was able to apply Tetraseal to the undersides of the car, but in doing so I found a new issue or three to resolve.
The replacement oil & filter had been sitting at Mulsanne Motors for a wee while, waiting a quiet lunchtime and a free ramp. When the two combined I was able to get H9 WAP up on a two poster and set about making the change. The process itself is really straightforward and could be done on a level driveway but having access to a ramp though makes it 100 times easier.
The old oil that came out, at least the stuff left in the engine that hadn't leaked away, was as black as pitch. I dread to think when it was last changed. Given all the other mechanical niggles with the Sov I would guess that it has been years since she's seen fresh stuff. Getting the filter itself off proved to be a wee bit frustrating, given that it was screwed on by the Hulk or something. I used a plumbers wrench to give me some leverage and it eventually unscrewed after putting up a fight. After changing the filter & while the old oil drained away, I checked the diff and I'm pleased to say it had fresh looking oil, with a bit of red colour to it, and at the correct level. One less thing to worry about there!
Something that had been bothering me though, and I had been unable to do yet, was rust-protect the vulnerable areas of the car. A couple of months ago I made a start on it and was able to wire brush the Jag's bahookie to remove any surface rust, mud and other rubbish that had accumulated. The A-frame at the rear, front subframe mounts & areas around the sills/arches were places I wanted protection on as soon as possible. Using an air-line and sprayer I was able to put a fairly comprehensive coat of Tetraseal on the car. Hopefully this will arrest the development of any rust already present, and protect the car for a few years. I don't intend to drive it during the winter so she won't be exposed to road salt which should help keep her body in good condition.
While I was doing that my colleague at Mulsanne, Tommo, was doing a few basic checks since the Jag was airborne. He noticed that there is slight play in the OSF (Offside Front - side closest to the middle of the road) wheel bearing, there was an oil leak from the front of the engine somewhere - possibly cam-cover gasket, and the NSF (Nearside Front - side closest to the kerb) brakes were seized. Oh. Bum... Well, that at least explains the pull the the left which didn't go away after the alignment was done, or when there's an extra couple of pounds in the NSF tyre. Speaking of tyres, I spotted a nail in the NSR, which would explain why it goes flat... Tommo also picked up on the rattle from the upper timing chain tensioner but was otherwise very complimentary about the overall condition of the car.
Once she was back down on her 4 wheels, The Beastie swallowed nearly 9 litres of fully synthetic oil. It made an immediate difference. The rattle was lessened (I hope that means the tensioner was just clogged) and there seemed to be more urgency about her on the way home. Mindful of the seized calliper though I parked her up and let her be while I started sourcing some of the bits I need.
Coming to the rescue again was Mr Rob Jenner, without whom my Jag would not be on the road, nor would it look and work as well as it does. His advice, council, encouragement and seemingly inexhaustible supply of spare parts have certainly kept the whole project going. This time he was able to supply two front callipers & their carriers, barely used front discs, a complete set of unworn pads, an early type upper timing chain tensioner, and a wheel brace. Most of the parts came from his Wife's unfortunate 4.0 Sport which met an untimely end in a ditch near their home last winter.
As the bits had been off the road a wee while, they needed cleaned up. This was done at the college during one of the workshop classes & was a good chance for the class to practise some care & maintenance skills. One stumbling block was the pad retaining springs as one snapped in the OSF calliper and needs to be drilled out. If the calliper becomes unserviceable I may just have to replace the one. Not recommended, but at least it's a plan B. The college will be getting used again this coming Thursday as the replacement bits are all fitted, during class once again because the work needing done conveniently falls within the syllabus. The puncture will be repaired at the same time, as it, also conveniently, falls within the syllabus too! I'll maybe do the tensioner at the same time too but while researching the Jaguar Technical Service Bulletin relating to rattles it may be a job for another day as the cam cover apparently needs to be removed when switching out the later type one currently fitted to H9 WAP. I'll give the fresh oil time to circulate & hopefully that will solve the problem.
Well, I did say it had been an eventful few weeks!
Subscribe to:
Posts (Atom)